1. You Must Have Neutral Feet
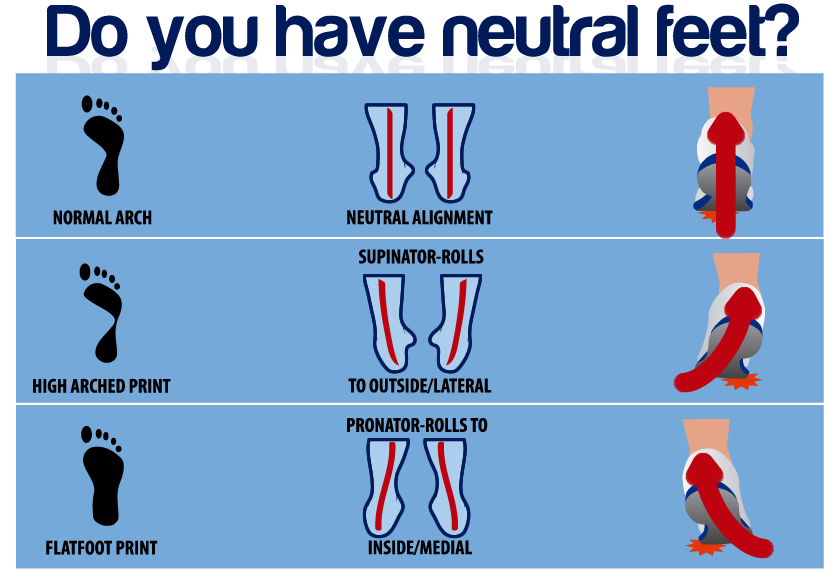
The goal of standing, walking, and running should be to maintain a neutral foot position. This not only includes avoiding pronation (foot rolls inward) and supination (foot rolls outward), but also avoiding pigeon feet (when both feet point towards each other) and duck feet (when both feet point outwards). Asymmetrical positioning with one foot straight and the other ducked way out into external rotation is a common standing positional error that leads to problems from the knees up. Ground reactive forces (pounding the floor) does not get absorbed well in the non-neutral side, and before you know it your knees, hips, and low back are achy.
It is very common for people to attempt to correct this problem with either over the counter orthotics or customized orthotics. Realize that when you put a rigid support under your foot, you are not creating a system that helps itself over time, you are making it dependent on that support. The same is true when we hurt our back and begin to rely on a back brace or belt for support rather than strengthening our own body. FACT: Rigid supports make the muscles in your feet weak and eventually atrophy. If have flat fleet and want a higher arch, then you need to work on activating your intrinsic foot muscles. The “Janda Short Foot Exercise” is my go-to move for building such muscles up.
If you have foot problems the you need to start practicing standing, walking, and running with neutral feet. Watch people in public places – see who's walking/running neutral and who has a movement fault. If you can spot the error in others, then you will be more cognizant of your own movements.
Organizing neutral feet is easier if you are in a braced, “neutral posture” position. The simple four step activation process to achieve neutral spine position (good posture) is the following:
- Engage or gently contract your glutes (this causes your pelvis to rotate backwards)
- Engage your abs (you'll feel your ribs rotate downward)
- Move your shoulders back and down (palms should be touching the side of your legs with thumbs pointing forward)
- Tuck you chin backwards (if you walk up to a wall, you should feel your heels, glutes, shoulder blades and back of your head all touching the wall)
2. You Must Have a Supple Spine
We all spend way too much time with our arms in front of us for daily tasks. We're consumed by computers, cell phones, writing, reading, exam/note-taking, driving, household chores, holding babies, etc. The human spine is repeatedly forced into a “head-forward-rolled shoulders-hunch-back” position. Ultimately this posture freezes up the mid-back and is the beginning of mobility problems. To prevent yourself from being permanently stuck bent forward, mobilize your thoracic spine (mid-back) in both extension and rotation. It’s simple, you just need to do it to counter-act all that time spent in a forward posture.
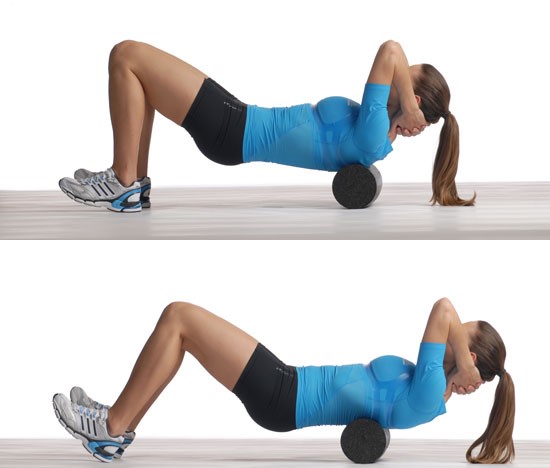
Mid Back Extension Exercise
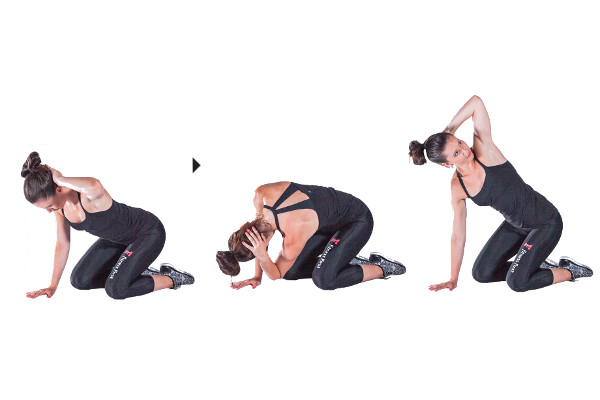
Mid Back Rotation Exercise
Optimal breathing mechanics involve a fully-expanded ribcage and lungs. When you finish sprints where do you go to get the most oxygen – bent over looking at the ground or hands above head and an upright-posture? Similarly, just compare the difference of position when throwing a ball. Hunch forward and throw, then do one with a relaxed mid-line stable position and you be the judge of what is the optimal posture for movement.
3. You Need to Be Able to Squat! Properly.
Most people can’t squat properly for two reasons: lack of mobility or stability.
- Mobility: this means you've got problems in your ankles or spine
- Stability: your glutes are weak or you have uneven arches in your feet
The first thing you need to do is watch yourself squatting in front of a mirror and determine if you are doing any of the following:
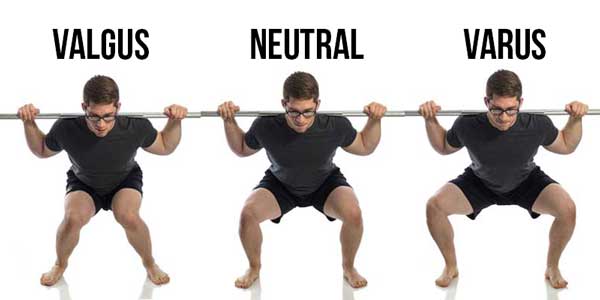
Squat Movement Errors
Valgus Knee (your knees collapse medially or inward – above picture on the left)
- Correction: Glute activation drills. Create external rotation torque during squat
Collapsed Arch (hyperpronaton of foot)
- Correction: Janda Short Foot Exercise, neutral foot positioning, mobilize plantar fascia (use a lacrosse ball to roll your foot), work on ankle and calf mobility
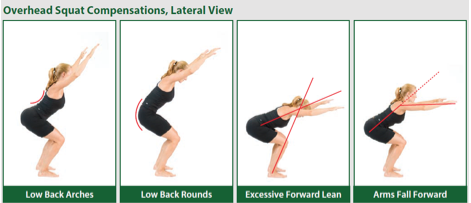
Excessive Forward Lean (Hips –> Spine angle not parallel to ankle –> knee angle
- Correction: Mobilize thoracic-spine extension/rotation, learn how to breath when squatting
Anterior Translation of the Knee (moves forward in front of toes)
- Correction: Goblet or TRX squat to move center of gravity behind mid-line. Practice the hip-hinge and the Founder
Once you can squat well, you need to practice squatting properly as often as possible. That is, you need to resist fatigue and poor form from creeping back into your mechanics as you get tired. The goal is to do a Tabata set, 20 seconds on, 10 seconds rest, repeated for 4 straight minutes. You need to attain 10 squats in each 20 second interval to pass the test. If you don’t achieve the standard on the first try, get practicing and don't complain when you hurt your back because of exercising!
4. You Need to Have Normal Hip Flexion
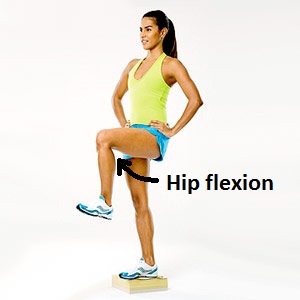
The picture to the left shows a 90 degree angle of hip flexion. That is not the standard of range of motion. You need to be able to balance on one leg with at least 120 degrees of hip flexion for 30 seconds on each leg to pass this standard.
Just because we spend an excessive amount of time sitting doesn’t mean we can attain the right position and stay balanced while expressing full hip range of motion.
If you fail the test then you need to practice it and also work on the posterior chain of the thigh and hip to free up that range of motion. Target the glutes and hamstrings with foam rolling, mobility bands, and voodoo floss.
5. You Need to Have Normal Hip Extension
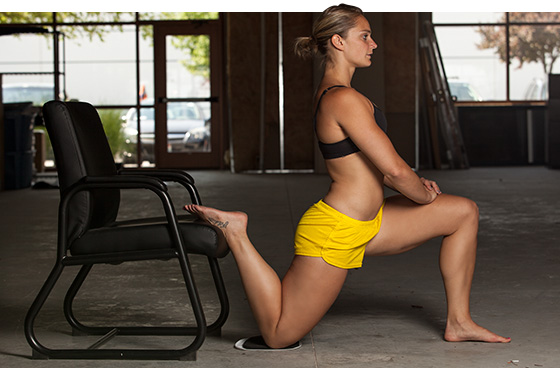
6. How's Your Ankle Range of Motion?
Ankle dorsiflexion (toes fly up to the sky) is often limited because of the sheer abuse we put it through in steps/day (10K average). Sports and working-out add to that load, as does wearing shoes with an elevated heel pad for a lifetime. So all you ladies who wear heals- you're ankle mobility sucks! Just saying. And who hasn’t rolled an ankle before? There’s a good reason why the ankle inversion sprain is the most common sports-related injury – we do a poor job of maintaining ankle health, making it even more susceptible to traumatic injury from athletics.
To test if you have good enough ankle dorsiflexion you need to perform a pistol squat position.
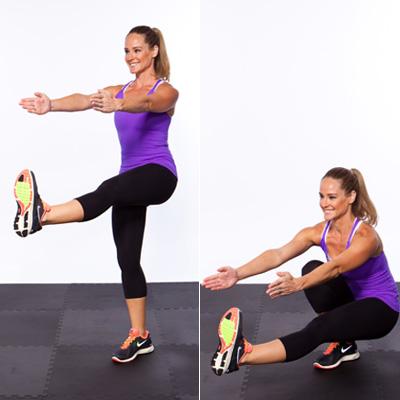
- Correction: posterior chain leg mobility (work on your plantar fascia, Achilles and calf), Voodoo Floss or compression strap your ankle.
Ankle Plantarflexion (toes plant down to the ground) is overworked in ballerinas from dancing on point and in those who have high standards of fashion and choose high-heels over zero-drops. For everyone else plantarflexion is a position we rarely spend time stressing. This standard will burn like crazy for those people.
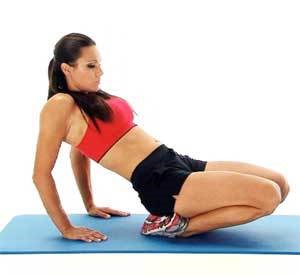
- Correction: Anterior leg mobility for anterior shins, quads, couch stretch
7. Do you know how to warm up and cool down?
People get injured when they try to do too much too soon. Jumping into a run, basketball game, or workout cold is a quick way to tweak a muscle.
The warm-up simply needs to involve non-linear (dynamic) movement in order to prepare your tissues for a 3-dimensional world of movement. Think arm circles as opposed to punching straight jabs or swinging your legs back and forth as opposed to stretching your quads. This principle applies to all major muscles/joints in your body. Jogging is a good start, but a dynamic stretch in all 3 planes (flexion/extension, lateral flexion, and rotation) will be a more complete awakener for your hips.
A good warm-up will elevate your heart-rate, begin to make you sweat, take your joints through multiple planes of motion, heat your body temperature, and prime your nervous system for explosive or endurance movements.
I recommend that you warm-up for a time inversely proportional to the time spent doing your activity/competition. For example, a sprinter running the 100m should warm-up much more than a marathoner. The more power and energy expenditure required for the activity, the more “warm” you should be to be ready for it.
Cooling down is similar to the warm-up in tasks performed but opposite in its goals. You want to slow your heart rate down, help propel metabolic waste products through the lymphatic system, and release tension to overused tissues torched during the activity. If static stretching were ever recommended, it would be during the cool-down and never before!
8. Address All Your HOT SPOTS!
If you feel pain during or after moving or your workout, then what you were doing was not functional movement- it was not healthy. If it feels sketchy, it is sketchy.
There’s a difference between pain as a symptom and pain as an indicator of a “hotspot” aka trigger point, knot, myofascial adhesion, excessive scar tissue formation, etc. Therapeutic treatment that involves manual release of hotspots WILL CAUSE PAIN/INTENSE DISCOMFORT, but the difference between pain as a symptom should be obvious. If it’s not obvious – then go seek medical help. If you roll over an area and you feel no pain or discomfort, well then, don’t waste your time rolling out that tissue. Would you brush your teeth if you knew they were clean, say, right after you just brushed them? Focus on the hotspots instead of rolling simply for the sake of rolling.
Most of you know that the foam roller is the toothbrush for the human body, but other tools help do the job as well, sometimes even more so because they can help you access difficult to reach anatomical locations with ease. Lacrosse balls, golf balls, softballs, baseballs, yoga balls, the Stick and any metallic soft-tissue release instrument – they all have their place.

One new tool designed and developed is “The Compression Strap” which has been revolutionary due to its simple application and outstanding results with restoring range of motion to stuck, adhered, laminated tissues.
9. Do Not Workout If You're Not Hydrated
You need to ingest half of your body weight in fluid ounces every day to maintain MINIMALLY ACCEPTABLE hydration levels. So if you weigh 160 lbs. that’s 80 fl. oz. per day, which is 4 full blender bottles worth. If you are that size then I would suggest you carry a water bottle with you EVERYWHERE you go, and fill it up 4 times a day at the bare minimum. Drink fast enough to get all that fluid consumed throughout the day!
This amount does not account for replenishing fluids lost from athletic activity, especially if you sweat a lot or play in a hot/humid environment. In those cases, up the dose or risk dropping critical performance metrics like VO2 max (maximum volume of oxygen available).
Hyponatremia is a condition most commonly seen in endurance runners that over-hydrate but fail to spike their water with a key ingredient – electrolytes! These minerals are known as “water-magnets” due to their ability to create a concentration gradient in the collecting ducts of the kidneys, which allows water to be absorbed more readily. Without electrolytes like Magnesium, Calcium, Potassium, and Sodium, a large quantity of water would pass through our system straight into the great white porcelain bowl. In order to prevent this loss of water retention, simply sprinkle your water with a pinch of Himalayan or store bought Sea salt.
Even if your urine is clear, you could be absorbing and retaining more of that water. Be like a cactus, suck up that water to the best of your ability, and aid your body’s absorption of water with salts!
10. Can you Jump and Land Properly?
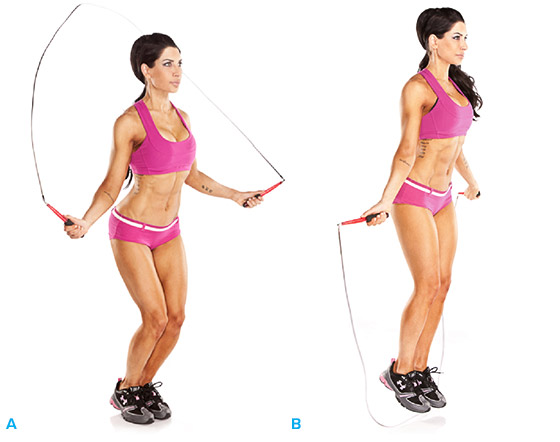
Much like squatting mechanics, if you cannot jump and land with neutral feet, knees, and hips you will likely develop patellar tendonitis or worse, tear your ACL or be susceptible to some other traumatic injury given enough time and opportunity in the gym or crossfit arena. It doesn’t matter how strong you are – your tissues can only handle excessive stress until they can’t anymore. When something finally breaks down you will know and you will wish you prepared better by grooving a fluid, efficient movement pattern instead of a “ticking-time bomb” movement fault.
The jump/land test has 2 parts:
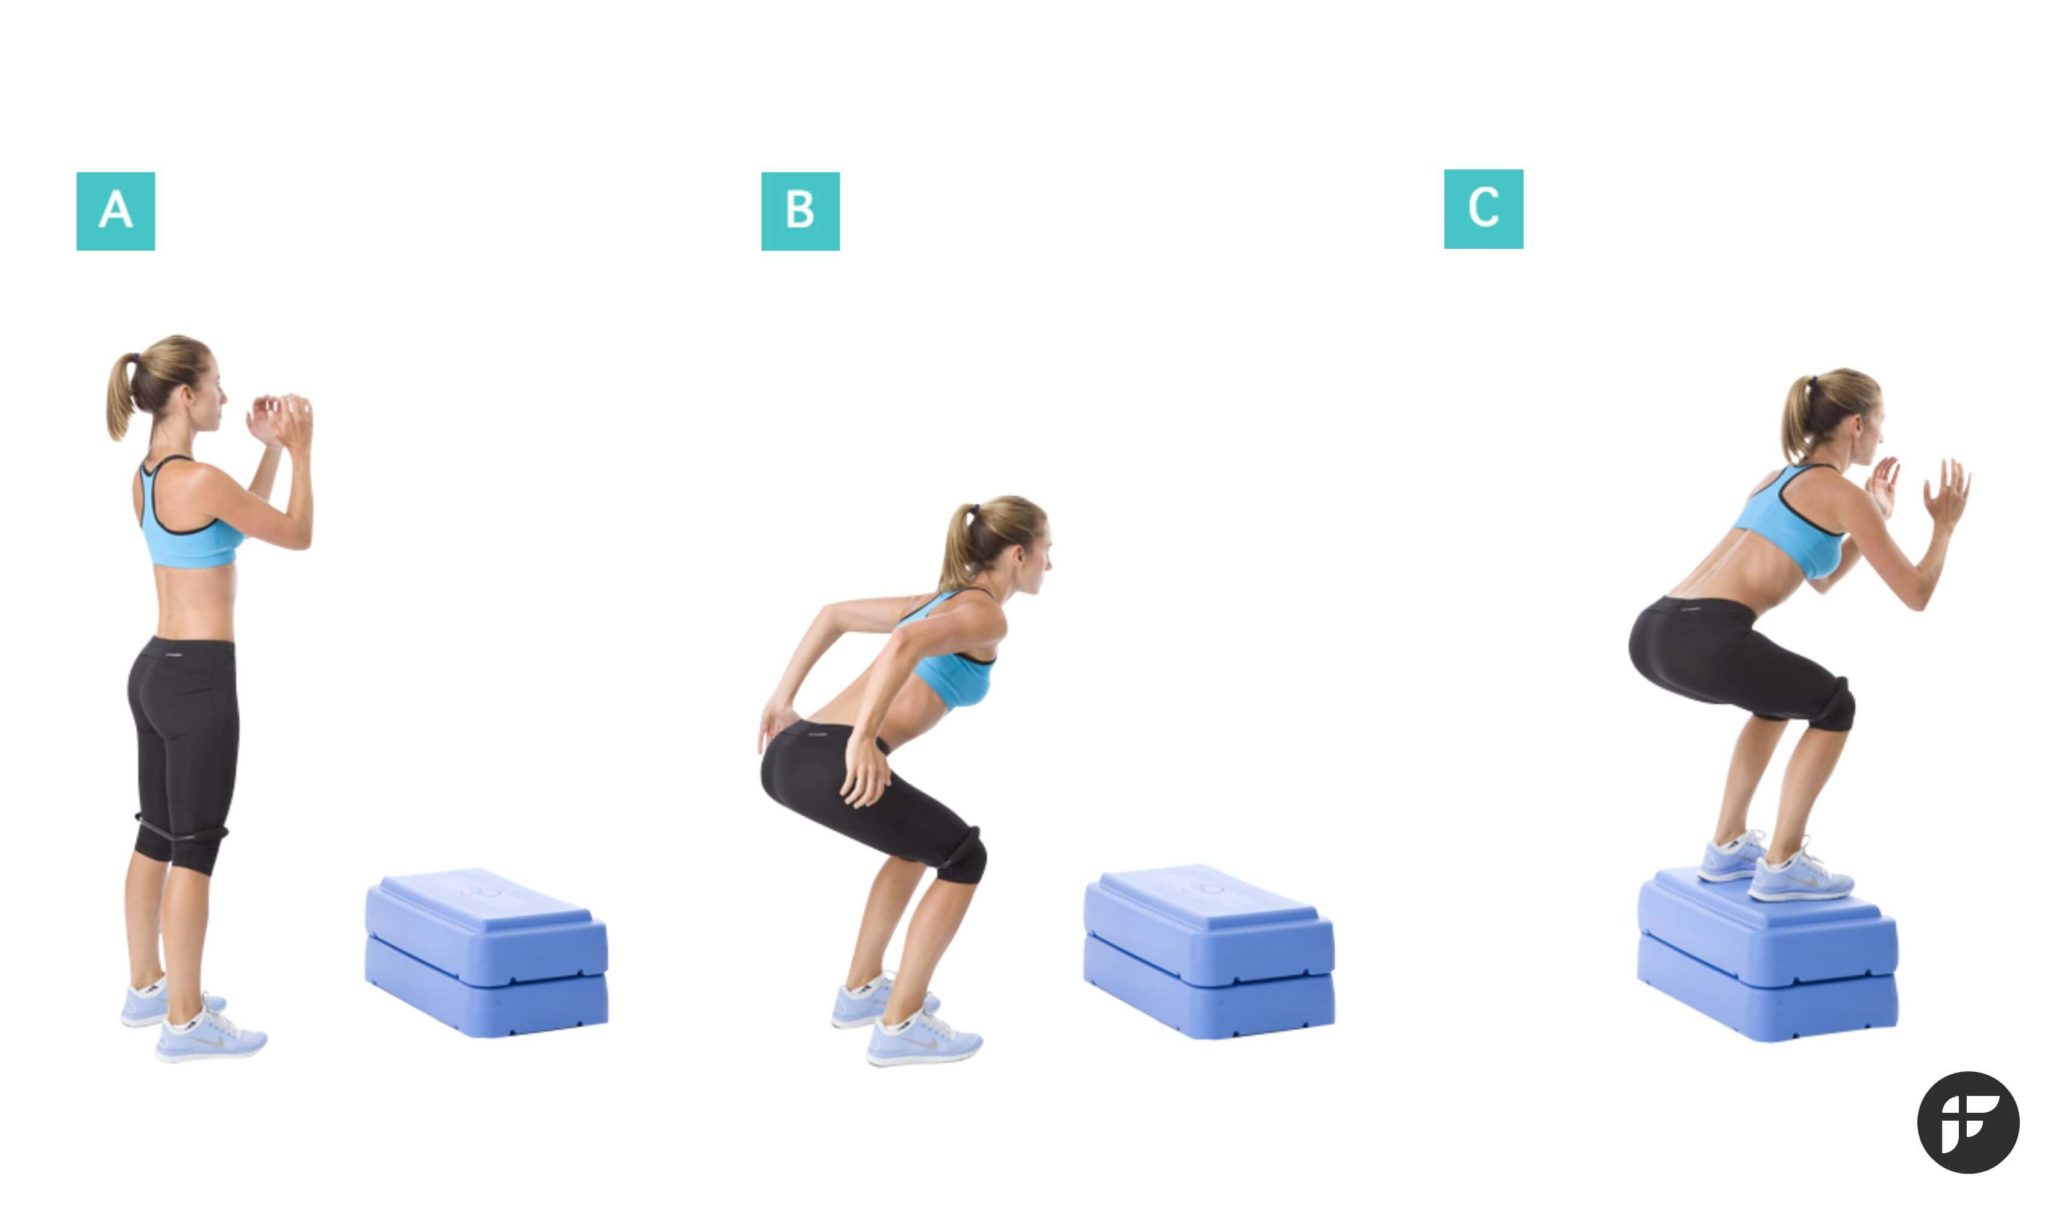
Common Errors:
- Knees forward, shins not vertical
- Pigeon/Duck feet (too much internal/external rotation)
- Lack of Midline Stability (hyperflexion of the low back)
Jump-Rope: perform single-leg jump rope hops with each foot 30 times with good form
Common Errors:
- Lack of Midline Stability (head/shoulders translate/round forward)
- Landing on heel (should land on forefoot)
- Pigeon/Duck feet
- Valgus collapse of knee
- Collapsed arch of foot
Do you need direction?
If you want to get in shape and never have to worry about hurting yourself because of an exercise program, then I urge you to find a professional who can help. Contact a local Chiropractor who specializes in Biomechanics and get all this stuff worked out. Your body is amazing; Unleash its power.

